How to connect Razorpay with our android App
Razorpay integration with android studio project
Table of contents
- Step 1: Create a new android studio project
- Step 2: Add dependency for Razorpay
- Step 3: Add internet permission in the AndroidManifest.xml file
- Step 4: Generate an API key for testing purposes in the Razorpay account
- Step 5: Designing part of the MainActivity's XML file / activity_main.xml
- Step 6: MainActivity.kt file
- Output video
Nowadays in the digital era, we all use android apps or websites for convenience. Many apps and websites require a payment transaction system to collect the money from the users and provide them with the facility according to their purchase. So Razorpay provides us with the best way to do these services. In this article, we will go through the integration of Razorpay with our android app using Kotlin.
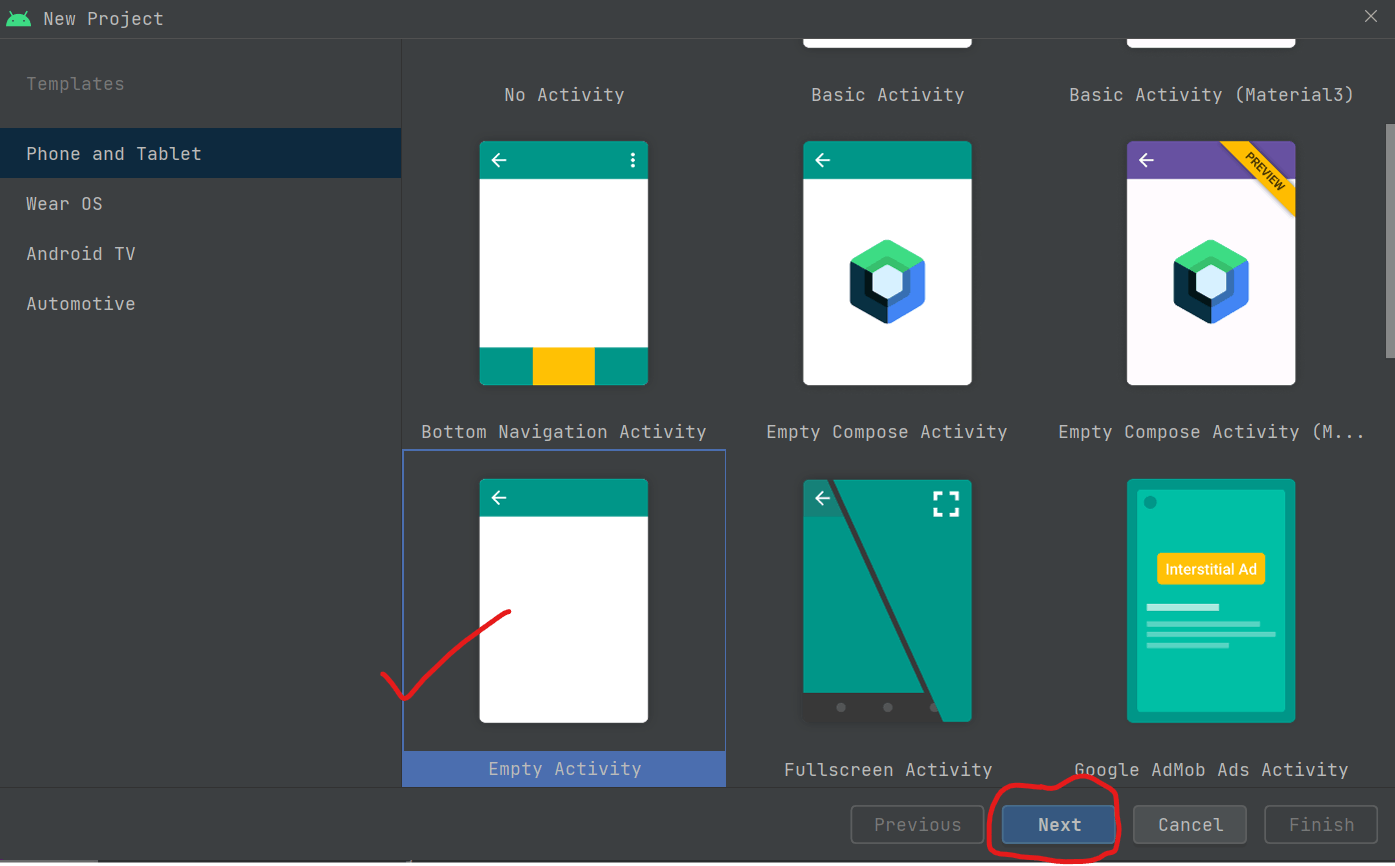
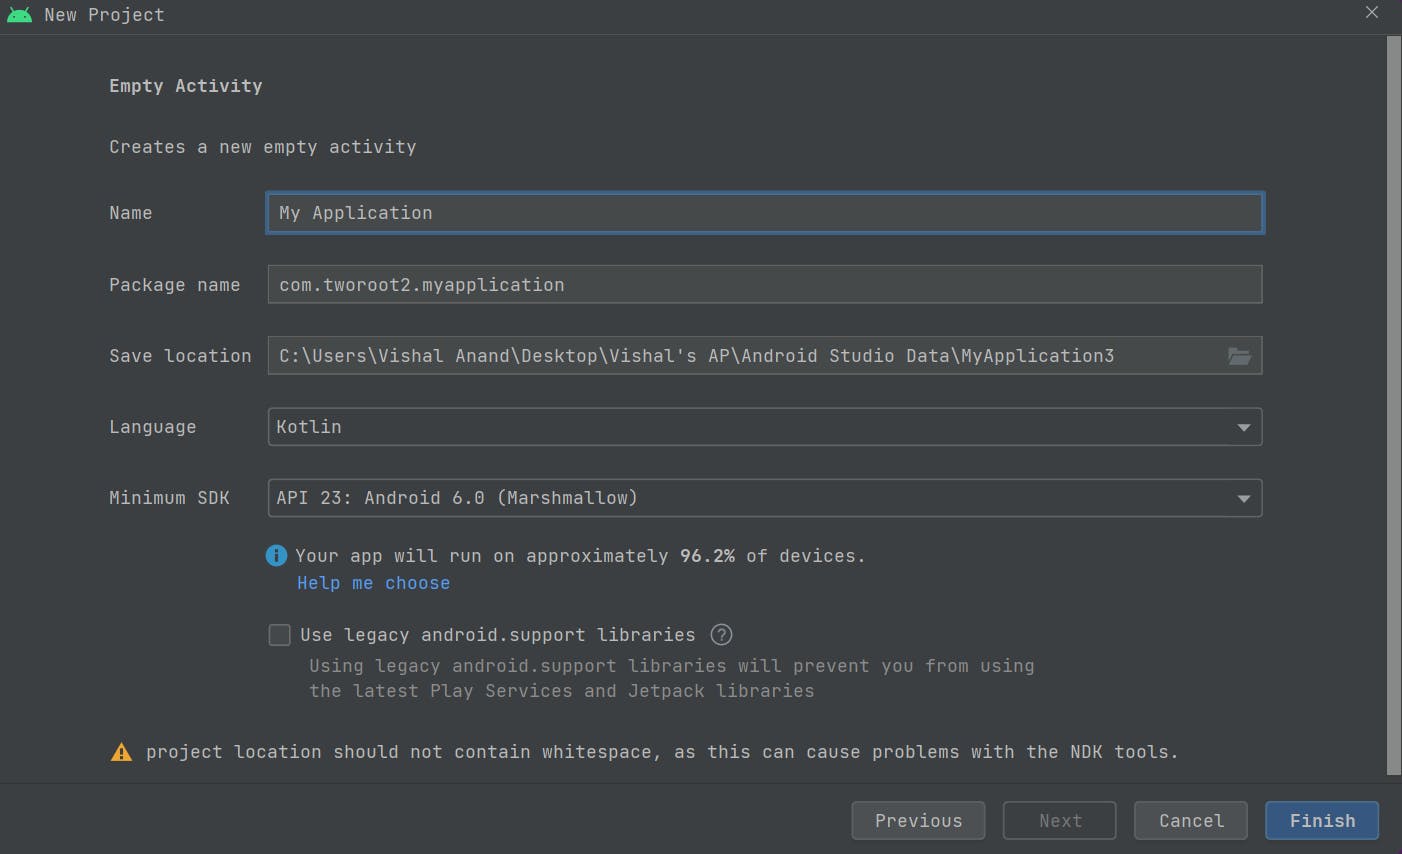
Step 1: Create a new android studio project
-> select empty activity -> enter name of your android app -> use language Kotlin/Java -> choose API level / SDK version -> finish
Step 2: Add dependency for Razorpay
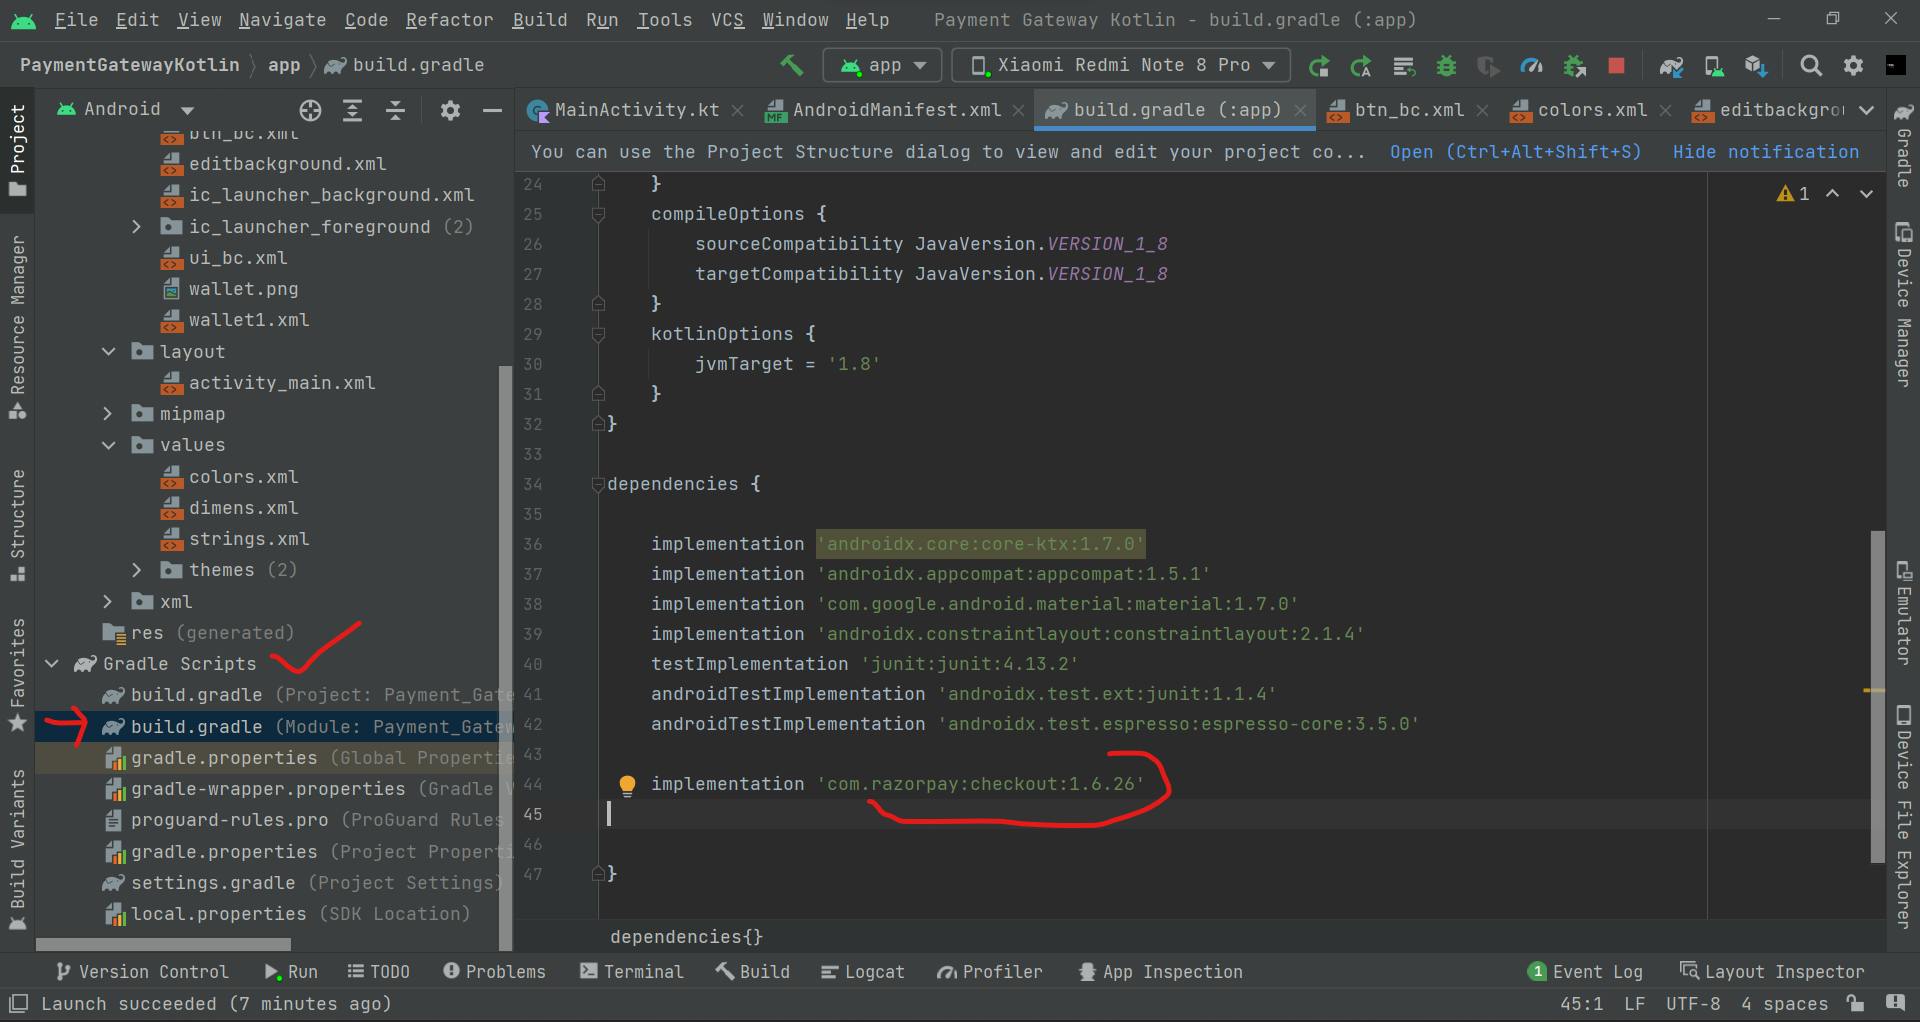
implementation 'com.razorpay:checkout:1.6.26'
replace 'com.razorpay:checkout:latest_version' with latest version
Step 3: Add internet permission in the AndroidManifest.xml file
<uses-permission android:name="android.permission.INTERNET" />
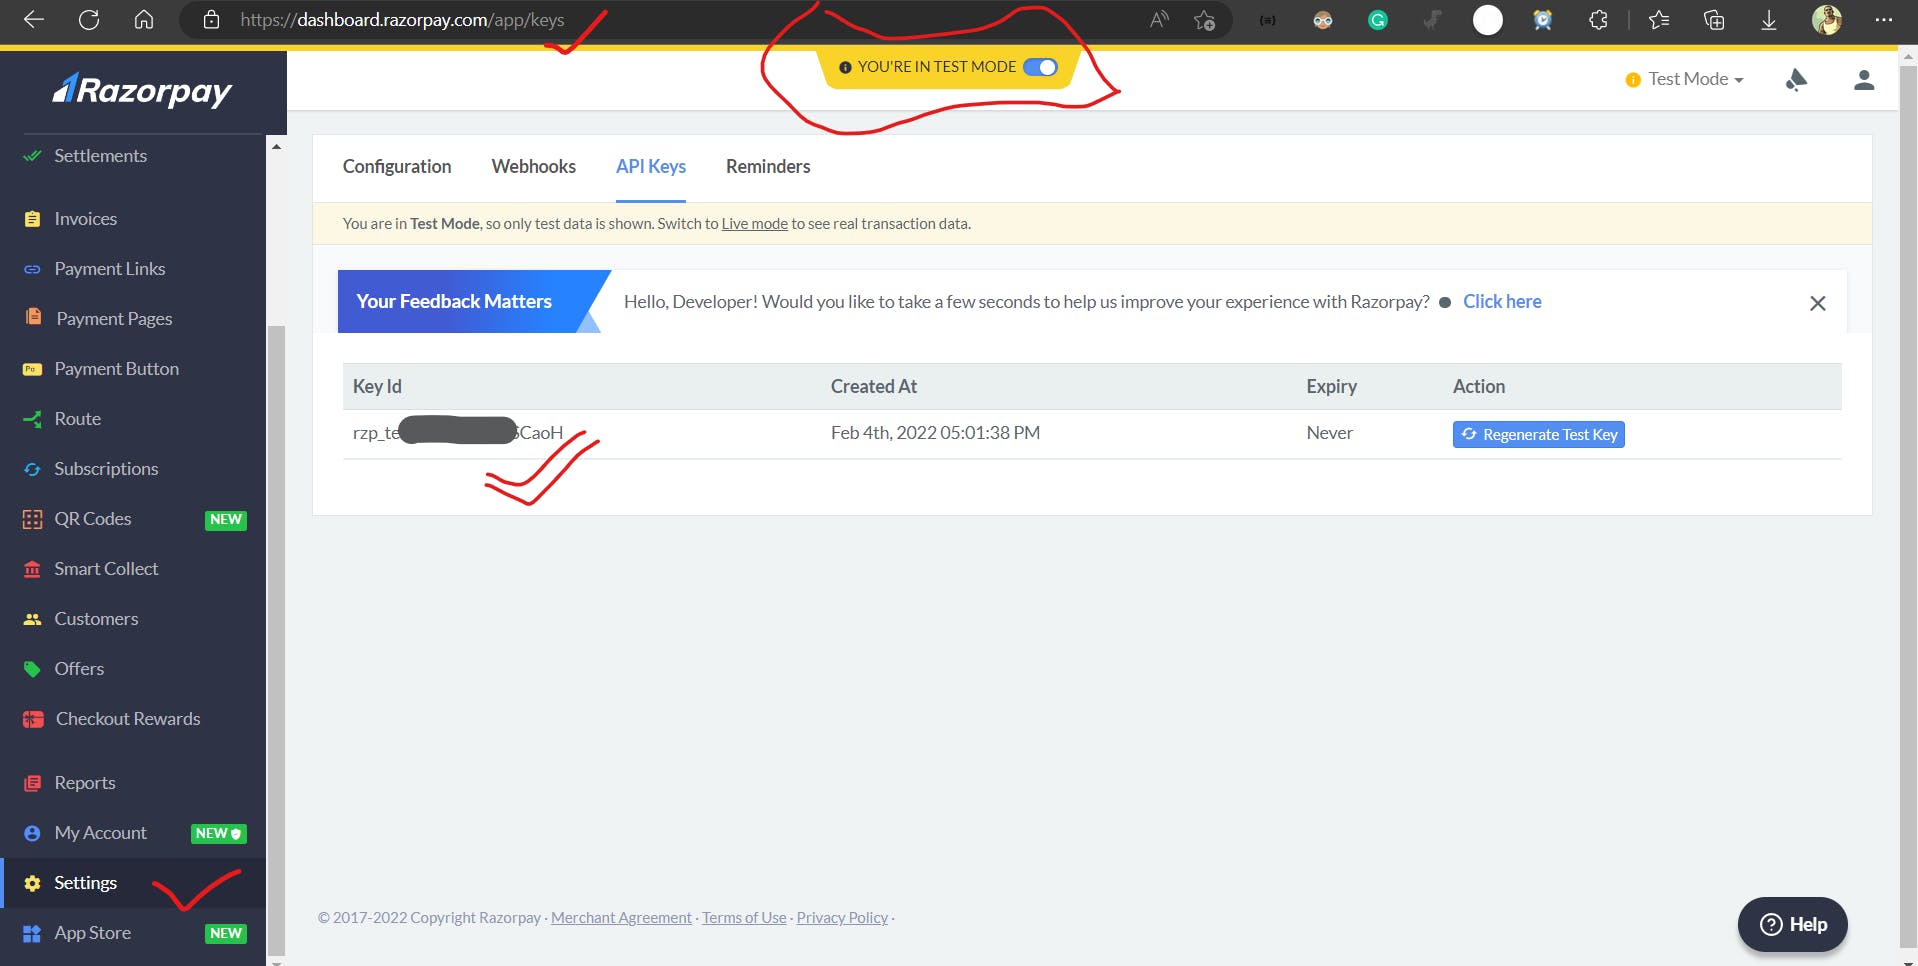
Step 4: Generate an API key for testing purposes in the Razorpay account
Create an account with Razorpay
open Dashboard or visit this link: Razorpay Dashboard
go to settings ( Note: Make sure you are in TEST MODE )
Navigate to API Keys
Generate your test API key here
Copy the generated API key for further use
Step 5: Designing part of the MainActivity's XML file / activity_main.xml
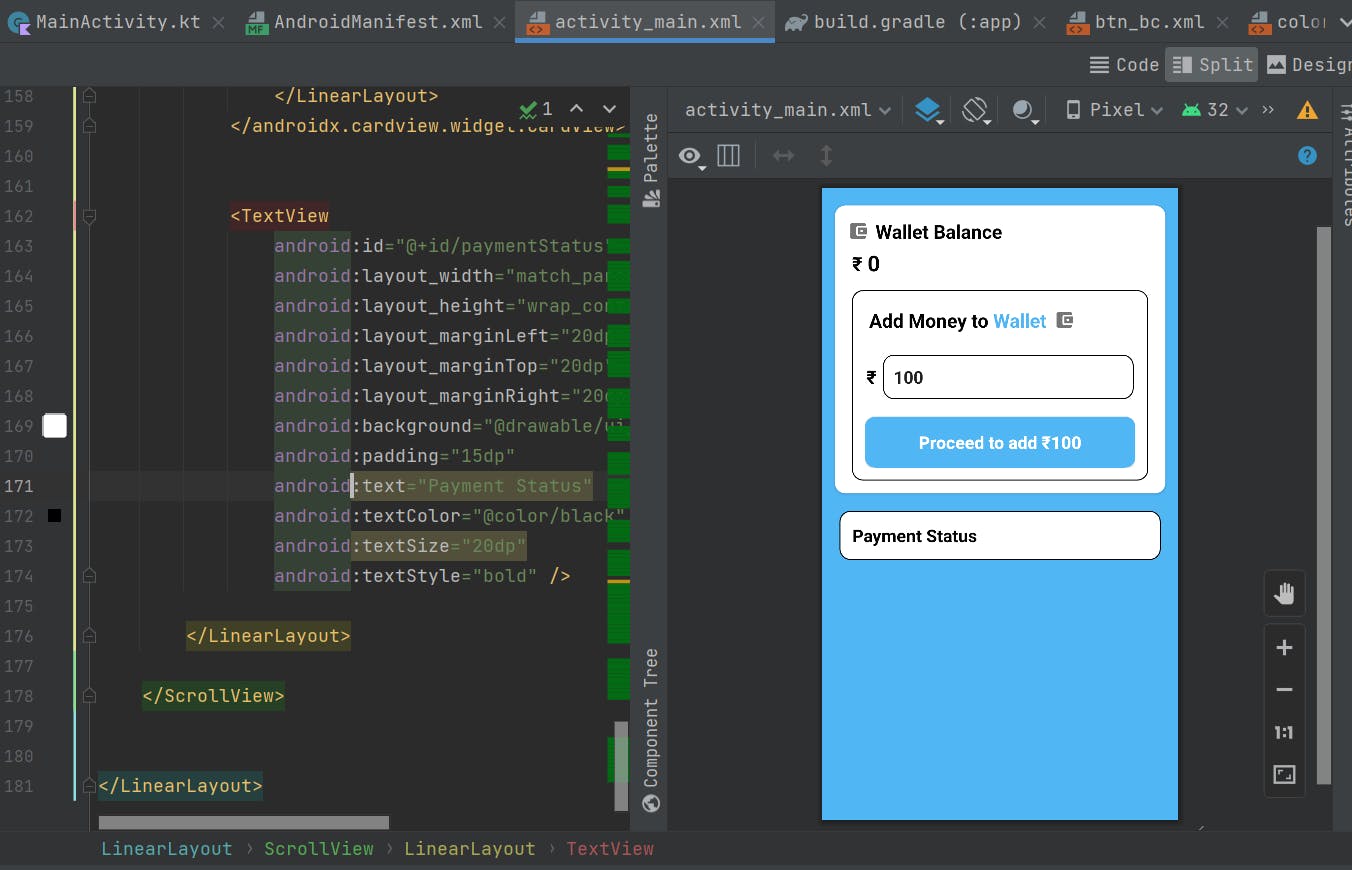
You can check the designing part from this GitHub Repository - here
Step 6: MainActivity.kt file
Now its time to code our implementation of Razorpay inside our app
package com.tworoot2.paymentgatewaykotlin

import android.content.SharedPreferences
import android.os.Bundle
import android.text.Editable
import android.text.TextWatcher
import android.view.View
import android.widget.Button
import android.widget.EditText
import android.widget.TextView
import android.widget.Toast
import androidx.appcompat.app.AppCompatActivity
import com.razorpay.Checkout
import com.razorpay.PaymentResultListener
import org.json.JSONObject

// here implement the PaymentResultListener interface and Add all their required methods
class MainActivity : AppCompatActivity(), PaymentResultListener {

    lateinit var addMoney: Button
    lateinit var balanceEdit: EditText
    lateinit var walletBalance: TextView
    lateinit var paymentStatus: TextView
    lateinit var sharedPreferences: SharedPreferences

    override fun onCreate(savedInstanceState: Bundle?) {
        super.onCreate(savedInstanceState)
        setContentView(R.layout.activity_main)

        supportActionBar!!.hide()

        addMoney = findViewById(R.id.addMoney)
        walletBalance = findViewById(R.id.walletBalance)
        balanceEdit = findViewById(R.id.balanceEdit)
        paymentStatus = findViewById(R.id.paymentStatus)

        paymentStatus.visibility = View.GONE

        // this is for the saving the data of Wallet Balance in SharedPreferences
        val prefs = getSharedPreferences("walletBalance", MODE_PRIVATE)
        val name = prefs.getString("finalAmount", "0")

        walletBalance.text = name.toString()

        balanceEdit.addTextChangedListener(object : TextWatcher {
            override fun beforeTextChanged(s: CharSequence, start: Int, count: Int, after: Int) {}
            override fun onTextChanged(s: CharSequence, start: Int, before: Int, count: Int) {
                if (s.toString().isNotEmpty()) {
                    if (s.toString().toInt() < 5000) {
                        addMoney.visibility = View.VISIBLE
                        addMoney.text = "Proceed to add ₹$s"
                    } else {
                        balanceEdit.error = "Max balance should not exceed to 5000"
                    }
                    if (s.toString().toInt() == 0) {
                        addMoney.visibility = View.GONE
                    }
                } else {
                    addMoney.visibility = View.GONE
                    balanceEdit.hint = "Amount"
                }
            }

            override fun afterTextChanged(s: Editable) {}
        })


        Checkout.preload(this@MainActivity)


        addMoney.setOnClickListener {
            val finalTotalAmount = balanceEdit.text.toString().toInt()
            startPayment(finalTotalAmount)
        }


    }

    // this method will initiate our payment process
    private fun startPayment(Amount: Int) {
        val checkout = Checkout()

        //here replace with your api key which you have copied earlier
        checkout.setKeyID("rzp_test_8wwxxxx6jYxxxxxx")

        try {
            val jsonObject = JSONObject()
            jsonObject.put("name", "twoRoot2")
            jsonObject.put("description", "twoRoot2")
            jsonObject.put(
                "image",
                "https://play-lh.googleusercontent.com/7897vqzpaq8crWunNxDBSXN03OrpHSusFdx1pZYy2xI-QD541gEzxRqviTALPiPU2ZI=w144-h144-n-rw"
            )
            jsonObject.put("theme.color", "#50B6F4")
            jsonObject.put("currency", "INR")
            jsonObject.put("amount", Amount * 100)
            val retryObj = JSONObject()
            retryObj.put("enabled", true)
            retryObj.put("max_count", 4)
            jsonObject.put("retry", retryObj)
            checkout.open(this@MainActivity, jsonObject)
        } catch (e: Exception) {
            Toast.makeText(this@MainActivity, "Something Went Wrong", Toast.LENGTH_SHORT).show()
        }
    }

    // logic for payment success
    override fun onPaymentSuccess(s: String) {
        try {
            paymentStatus.visibility = View.VISIBLE
            Toast.makeText(this@MainActivity, "Payment Successful$s", Toast.LENGTH_LONG).show()
            paymentStatus.text = "Payment status : ₹${balanceEdit.text} Added successfully Payment ID = $s"
            walletBalance.text =
                (Integer.valueOf(walletBalance.text.toString()) + Integer.valueOf(balanceEdit.text.toString())).toString()
            sharedPreferences = getSharedPreferences("walletBalance", MODE_PRIVATE)
            val editor = sharedPreferences.edit()
            editor.putString("finalAmount", walletBalance.text.toString())
            editor.apply()
        } catch (e: Exception) {
            Toast.makeText(this@MainActivity, "eRROR : $e", Toast.LENGTH_SHORT).show()
        }
    }

    // logic for payment failure
    override fun onPaymentError(i: Int, s: String) {
        Toast.makeText(this@MainActivity, "Payment Unsuccessful$s", Toast.LENGTH_LONG).show()
        paymentStatus.text = "Payment status : ${balanceEdit.text}Failed to add Payment ID$s"
    }
}
before running the app make sure you have implemented all UI parts from this GitHub repository - here
Output video
That's all for this
Thank you for reading this article, if you found this helpful please subscribe
